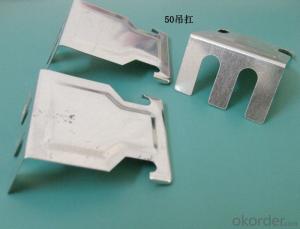
Ceiling Grid Brackets: Supporting Your Ceilings Structure
When you think about the components that make up the structure of your home, the ceiling might not be the first thing that comes to mind. But, believe it or not, it plays a crucial role in the overall stability and aesthetics of your living space. One of the unsung heroes of this architectural feature is the ceiling grid bracket. These small yet mighty supports are the backbone of your ceilings structure, and in this article, were going to dive into what they are, why they matter, and how you can ensure theyre up to the task of keeping your ceiling intact.
The Unsung Hero: Understanding Ceiling Grid Brackets
Ceiling grid brackets are those discreet, often overlooked metal pieces that connect the ceiling tiles to the main T-grid framework. They are typically made from materials like steel or aluminum, which are known for their strength and durability. These brackets are designed to distribute the weight of the ceiling tiles evenly across the grid, ensuring that the entire structure remains stable and secure.
Why They Matter: The Importance of Ceiling Grid Brackets
You might be wondering why these seemingly insignificant pieces are so important. Well, the truth is, without proper support, your ceiling could be at risk of sagging, warping, or even collapsing. Ceiling grid brackets provide essential reinforcement to the T-grid system, which in turn supports the weight of the ceiling tiles. This not only maintains the structural integrity of your ceiling but also contributes to the overall safety and comfort of your home.
The Art of Installation: A Step-by-Step Guide
Installing ceiling grid brackets might seem like a daunting task, but with the right tools and a little patience, you can do it yourself. Heres a simple step-by-step guide to help you through the process:
1. Gather Your Materials: Youll need ceiling grid brackets, a T-grid system, ceiling tiles, a tape measure, a level, a ladder, and a screwdriver or drill.
2. Measure and Mark: Start by measuring the area where you want to install the grid system and marking the points where the brackets will be attached.
3. Attach the Brackets: Using your screwdriver or drill, attach the brackets to the ceiling at the marked points. Make sure they are secure and level.
4. Connect the T-Grid: Once the brackets are in place, connect the T-grid to the brackets, ensuring that it is evenly spaced and aligned.
5. Install the Ceiling Tiles: With the grid system in place, you can now install the ceiling tiles, snapping them into the grid.
6. Check for Stability: Finally, give the entire structure a once-over to ensure that everything is secure and stable.
Maintenance and Care: Keeping Your Ceiling Grids in Top Shape
Proper maintenance is key to ensuring the longevity of your ceiling grid brackets and the overall ceiling structure. Here are a few tips to keep them in top shape:
– Regular Inspections: Check the brackets and the T-grid system for any signs of wear or damage. Address any issues promptly to prevent further problems.
– Cleaning: Keep the ceiling area clean by dusting and vacuuming regularly. This will prevent the accumulation of dirt and debris that could affect the brackets performance.
– Avoid Overloading: Make sure not to hang heavy objects from the ceiling grid system, as this could put undue stress on the brackets and lead to failure.
– Professional Help: If youre unsure about any aspect of your ceilings structure or need assistance with maintenance, dont hesitate to consult a professional. They can provide expert advice and ensure that your ceiling remains safe and secure.
When Things Go Wrong: Troubleshooting Common Issues
Despite our best efforts, sometimes things can go wrong with your ceiling grid system. Here are some common issues and how to address them:
– Sagging Ceilings: If you notice your ceiling tiles sagging, it could be a sign that the brackets are not providing enough support. Check for loose or damaged brackets and replace them as needed.
– Warping: Warping can occur due to humidity or temperature changes. If you notice warping, it may be necessary to replace the affected tiles or brackets.
– Cracking or Breaking: If brackets or tiles crack or break, remove them immediately and replace them to maintain the integrity of the ceiling structure.
– Noise Issues: Sometimes, the brackets can become loose, causing noise when the ceiling is touched or when there is movement in the room. Tighten any loose brackets to resolve this issue.
The Bottom Line: A Solid Foundation for Your Ceiling
In conclusion, ceiling grid brackets are an essential component of your ceilings structure. They may be small, but their impact on the stability and safety of your home is significant. By understanding what they are, why they matter, and how to properly install, maintain, and troubleshoot them, you can ensure that your ceiling remains a solid and reliable part of your home for years to come. So, the next time you look up, give a thought to these unsung heroes and appreciate the role they play in your everyday life.

